List view
Quick Start
Quick Start
User Guide
User Guide
Policies & GuardRails
Policies & GuardRails
Witness Anywhere: Remote Device Security
Witness Anywhere: Remote Device Security
Witness Attack
Witness Attack
Administrator Guide
Administrator Guide
Netskope SWG Integration
Overview
This guide outlines the process of configuring Netskope to seamlessly forward AI traffic to your dedicated WitnessAI proxy, including injecting User information for WitnessAI’s “Conversations” features.
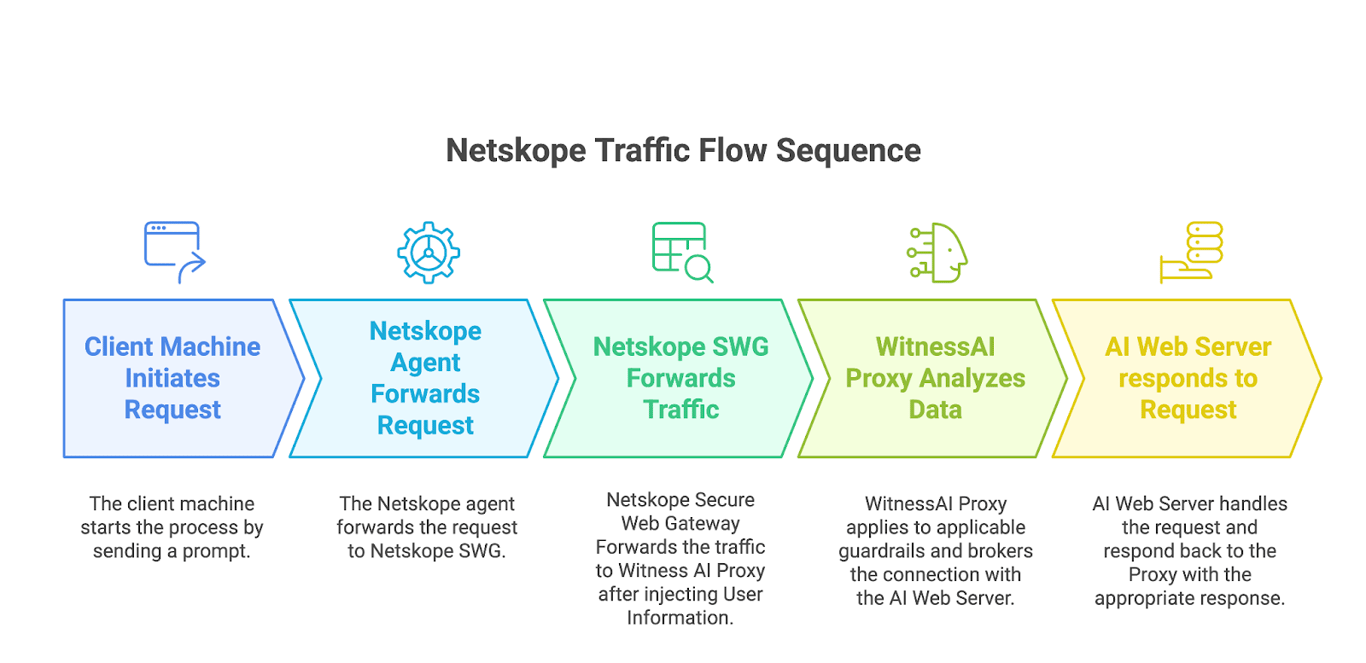
High Level Flow
- Traffic from the client machine is tunneled to Netskope Secure Web Gateway by the Agent installed on the client machine.
- Any traffic matching WitnessAI URLs
- Will undergo SSL inspection in Netskope
- Will be Forwarded to Witness AI Proxy after Injecting the User Name in the format witness.ai/johndoe as the X-Authenticated-User value in the header.
- Once the traffic reaches the WitnessAI Proxy, the applicable controls and guardrails are applied on the traffic.
Prerequisites (For Customers)
- Netskope Tenant should be configured to send Web and Non-Web traffic via Netskope.
Under Settings > Security Cloud Platform > Steering Configuration, the configuration applied to the relevant User Group/Organization Unit should steer All Traffic(HTTP/HTTPS and Non-web) via Netskope.
- Copilot and other thick client Apps use websocket connections and these traffic will need the above configuration to be routed via Witness AI Proxy.
- If SSL Decryption Bypass exists for Microsoft Domains/Apps, the Real-time Protection policies used for forwarding traffic to proxy will not be evaluated. Hence ensure that AI URLs used by WitnessAI are inspected.
- For automated URL category creation and management by WitnessAI, API Credentials from customer Netskope Tenant is required. Refer to API Credentials Section for details.

Configuration Guide
- CA Certificate Import
- To install the Proxy CA Cert on Netskope, navigate to Settings > Manage > Certificates
- Under Trusted CA tab, click New Trusted CA
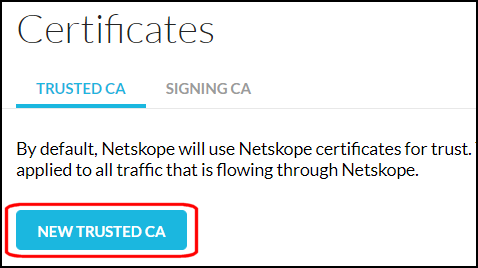
- Enter a file name and upload the CA certificate (.pem format) by clicking Select File (CA Certificate will be provided by the Account Team)
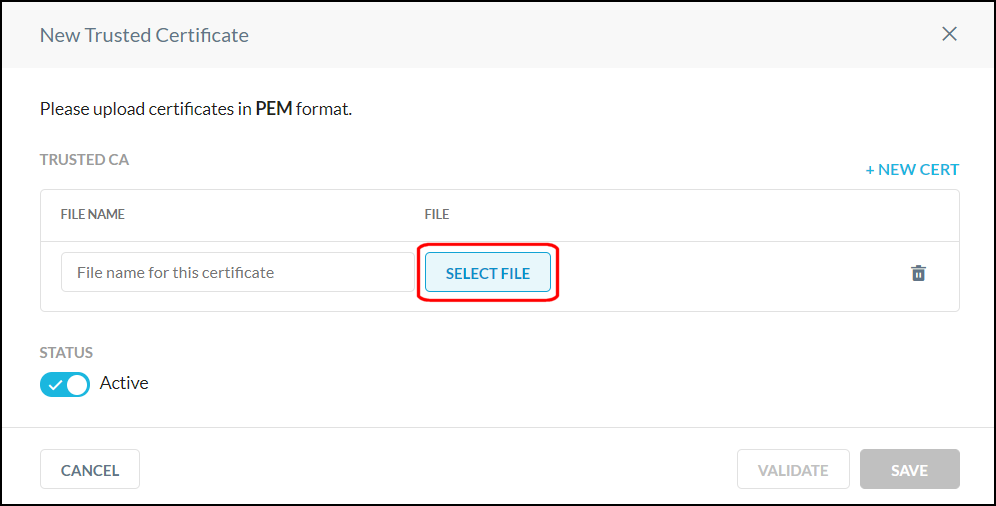
- Click on Validate and finally Save it.
- Forward to Proxy Integration Configuration
- To configure the Proxy details, Navigate to Settings > Manage > Forward to Proxy Integration and click on Setup Proxy
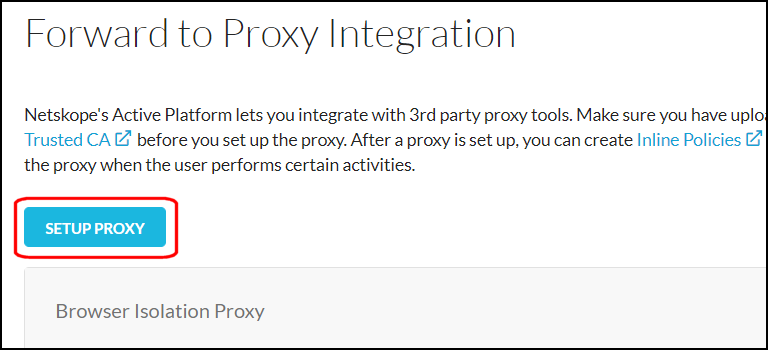
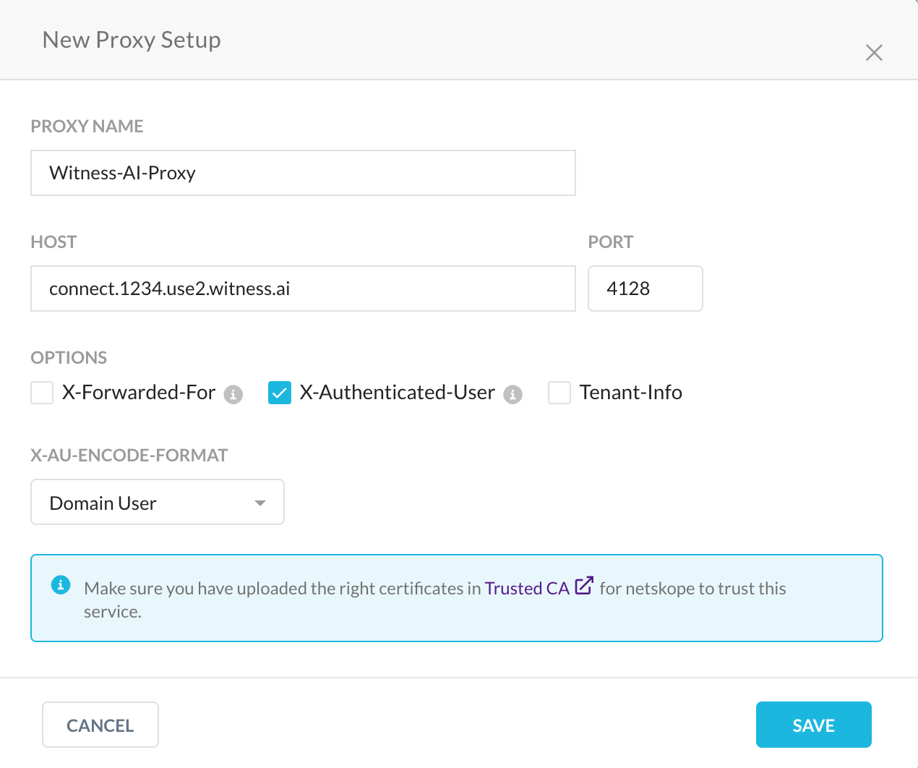
- In the new window, Configure the below settings:
- Proxy Name (Ex:Witness-AI-Proxy)
- Proxy Hostname (Ex: connect.{tenant-id}.{region}.witness.ai)
- Port : 4128
- Enable the X-Authenticated-User Checkbox
- Select X-AU-ENCODE-FORMAT as Domain User
- And Click on Save
- URL List and Category Creation
- For matching the required traffic and forwarding it to the proxy a URL category will be used.
- To create a URL category, Go to Policies > URL List and click on New URL Lists
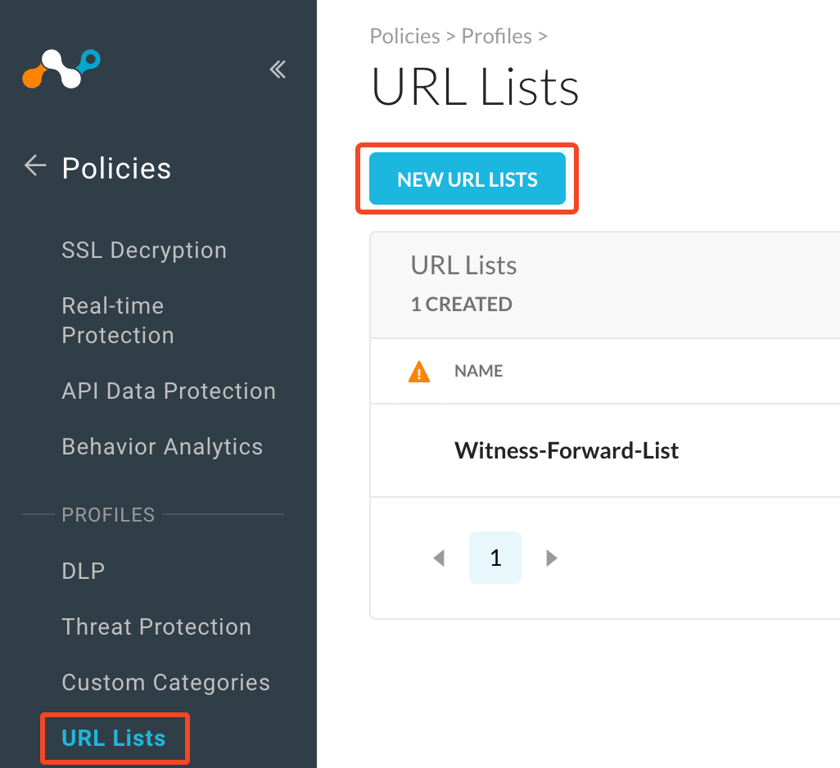
- In the new pop-up window, Give a URL List Name (Ex: Witness-Forward-List)
- Automatic Method: Generate API Credentials for the Netskope Tenant and share the details with the Account Team.
- In this method, Witness AI will automatically configure the URL List in the Customer Netskope Tenant using API and any changes in this URL List will be managed by Witness AI
- Refer to API Credentials section for steps to create the API Token
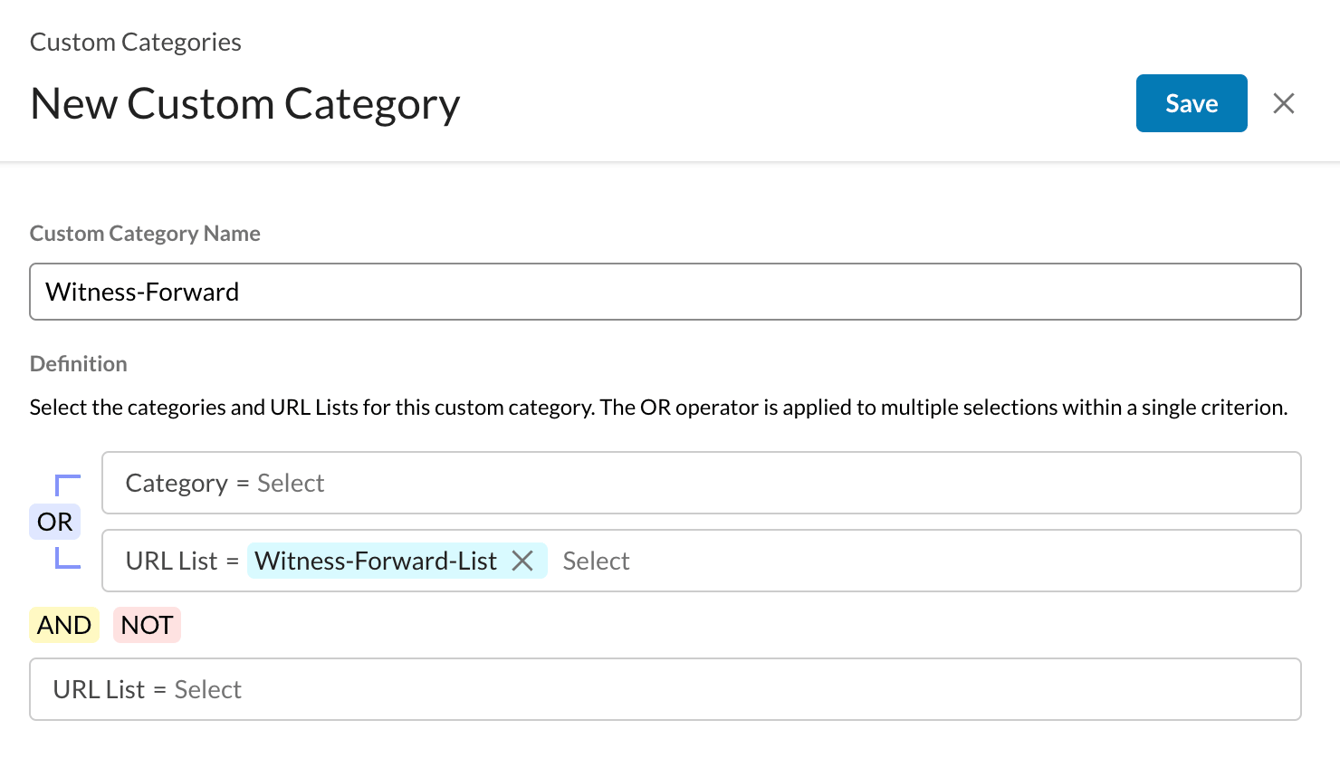
- Once the URL List is created via API automation, Go to Policies > Custom Categories and click on New Category.
- In the new Window, Enter a Custom Category Name (Ex: Witness-Forward)
- Under the OR Section, Select the URL list created via API automation (Witness-Forward-List) and Click on Save.
- Manual Method: The List values can be:
- Either Copy paste to the text field (Account Team will provide the list of URLs)
- Or Imported using a CSV by clicking on the Import from CSV option
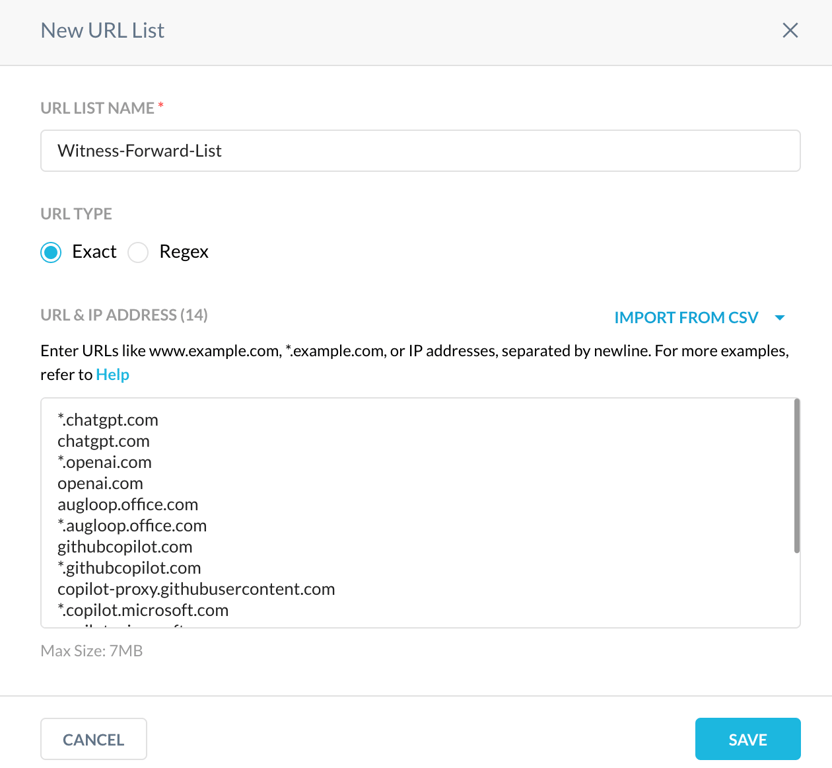
- And finally click Save.
- Now Go to Policies > Custom Categories and New Category
- In the new Window, Enter a Custom Category Name (Ex: Witness-Forward)
- Under the OR Section, Select the URL list created Before (Witness-Forward-List) and Click on Save.
- Real-Time Protection Policy Creation
- Real-Time Protection Policy will be used to forward any traffic matching the URL Category to Witness AI Proxy
- Go to Policies > Real-time Protection and click on New Policy, in the dropdown select Web Access.
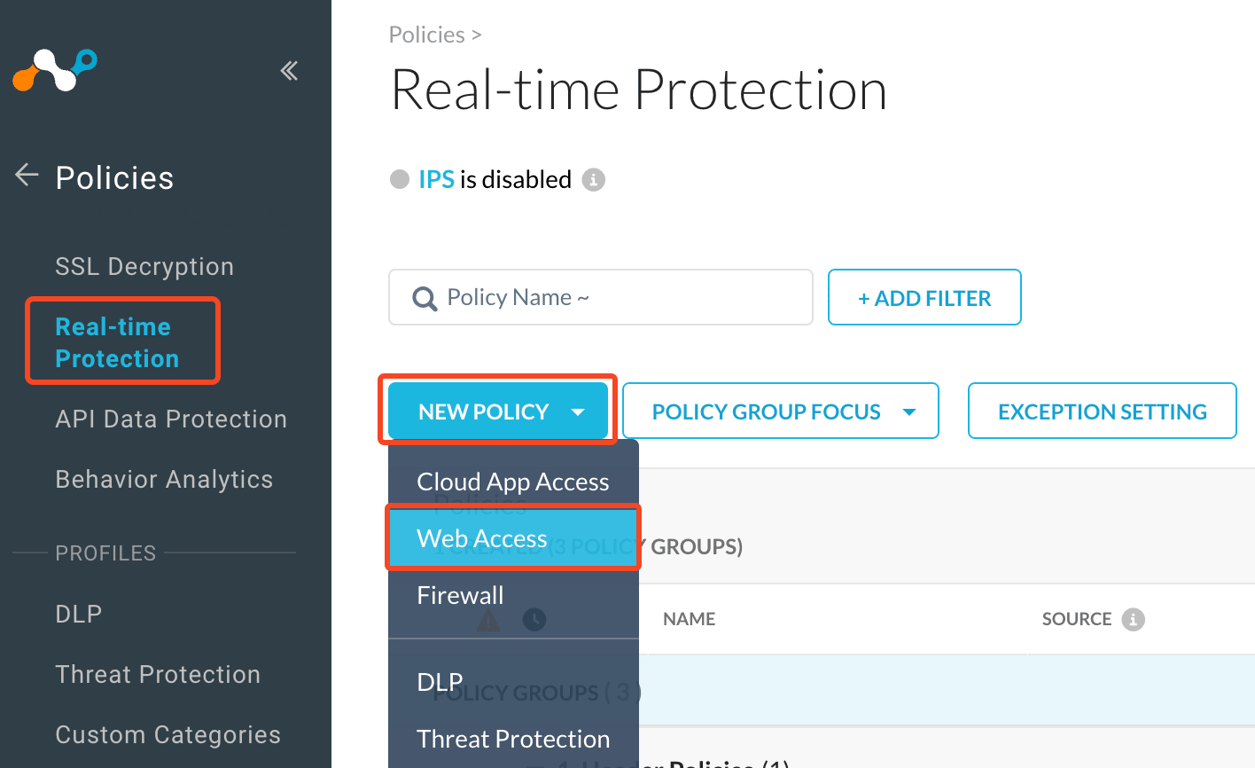
- In the new Window, Configure the below settings:
- Source: Select the Users, User Group or Organizational Unit intended for using Witness AI Solution
- Destination: Under Category Select the URL Custom Category created earlier (Witness-Forward)
- Profile & Action: Forward to Proxy
- Proxy: Witness-AI-Proxy
- Policy Name: Give a name for the policy. (Ex: Witness-Forward-Policy)
- Make sure that the policy status is Enabled and click Save
The configuration is now complete and all traffic matching the URL Category will be forwarded to Witness AI Proxy.
API Credentials
For automatic creation of URL List and Category in Customer Netskope Tenant, Customers would need to provide API Credentials for their Netskope Tenant. This API Credential will be used by our internal service to create and update URLs in the URL List/Category of the Customer Netskope Tenant.
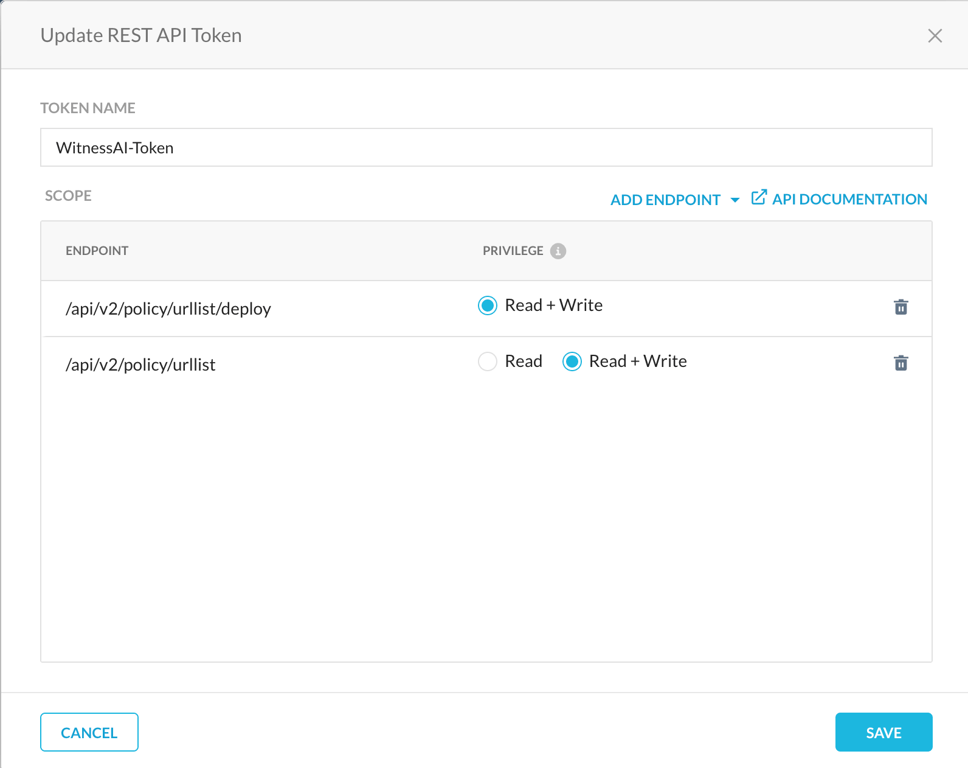
Steps for Creating the API Token
- Navigate to Settings > Tools > Rest API v2 and make sure that the REST API Status shows as Enabled. If It’s not, Enable it.

- Now click on New Token and configure the below values:
- Name: Give a name for the Token (Ex: WitnessAI-Token)
- Expires In: Give a high lifetime for the token. (Ex: 12 Months)
- Add Endpoints: Select the below Endpoints from the List
- /api/v2/policy/urllist
- /api/v2/policy/urllist/deploy
- Privilege: Read+Write
- And finally click Save.
- Copy the Token value from the success message.
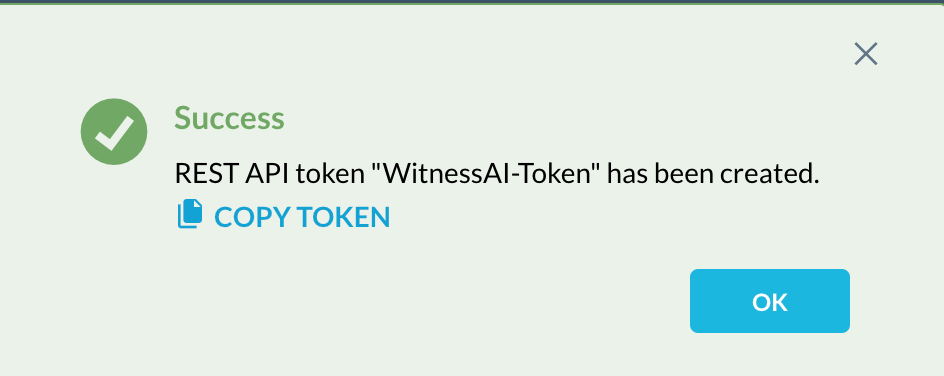
- Share the below information with the WitnessAI Account Team at the time of onboarding.
- Tenant ID from the Netskope URL
- API Token Value
Ex: https://{tenant-id}.goskope.com
- Once the customer instance is provisioned on WitnessAI side, a new URL List will be created in the customer's Netskope Instance called Witness-Forward-List via API.
- Now Go to Policies > Custom Categories and New Category
- In the new Window, Enter a Custom Category Name (Ex: Witness-Forward)
- Under the OR Section, Select the URL list created Before (Witness-Forward-List) and Click on Save.
- Use this Custom Category in the Real-Time Protection Policy as explained in Step 4.
 Made with Bullet