List view
Quick Start
Quick Start
User Guide
User Guide
Policies & GuardRails
Policies & GuardRails
Witness Anywhere: Remote Device Security
Witness Anywhere: Remote Device Security
Witness Attack
Witness Attack
Administrator Guide
Administrator Guide
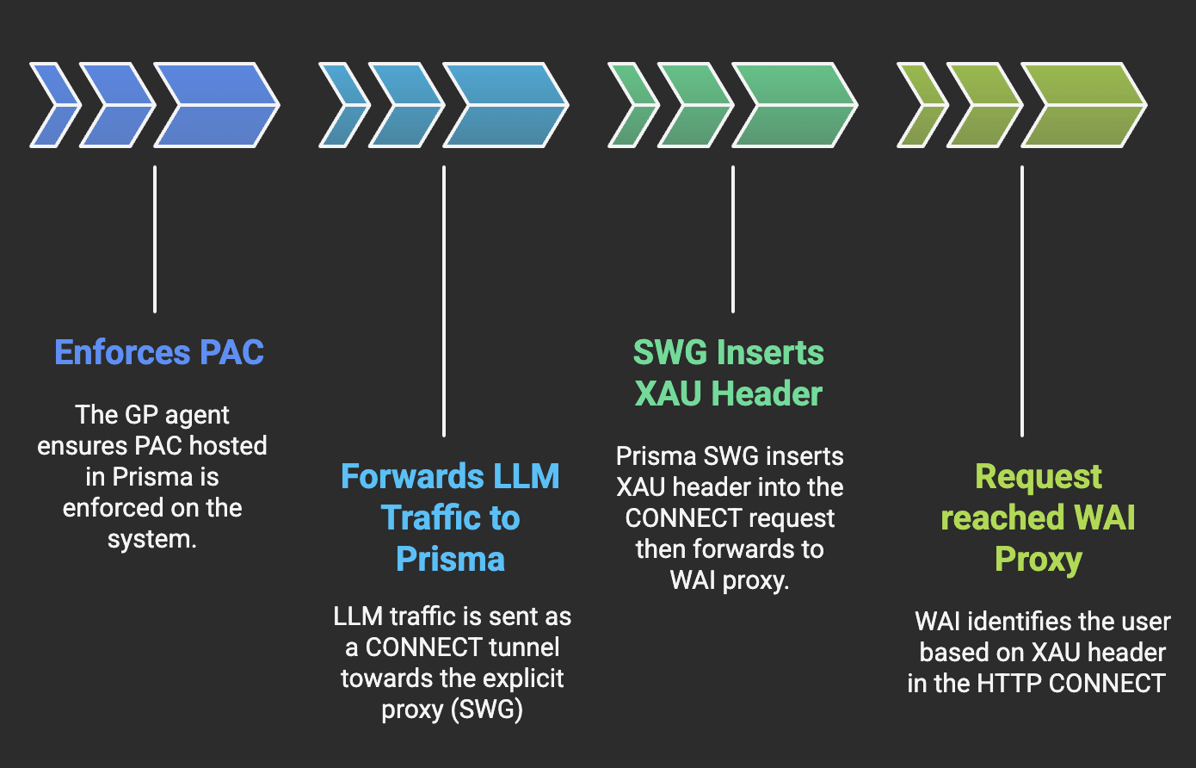
Prisma Access: Explicit Proxy
Traffic Flow
General Configuration
1. Install WitnessAI Root Certificate
- Select Manage → Configuration → NGFW and Prisma Access → Objects → Certificate Management. Select the Prisma Access configuration scope.
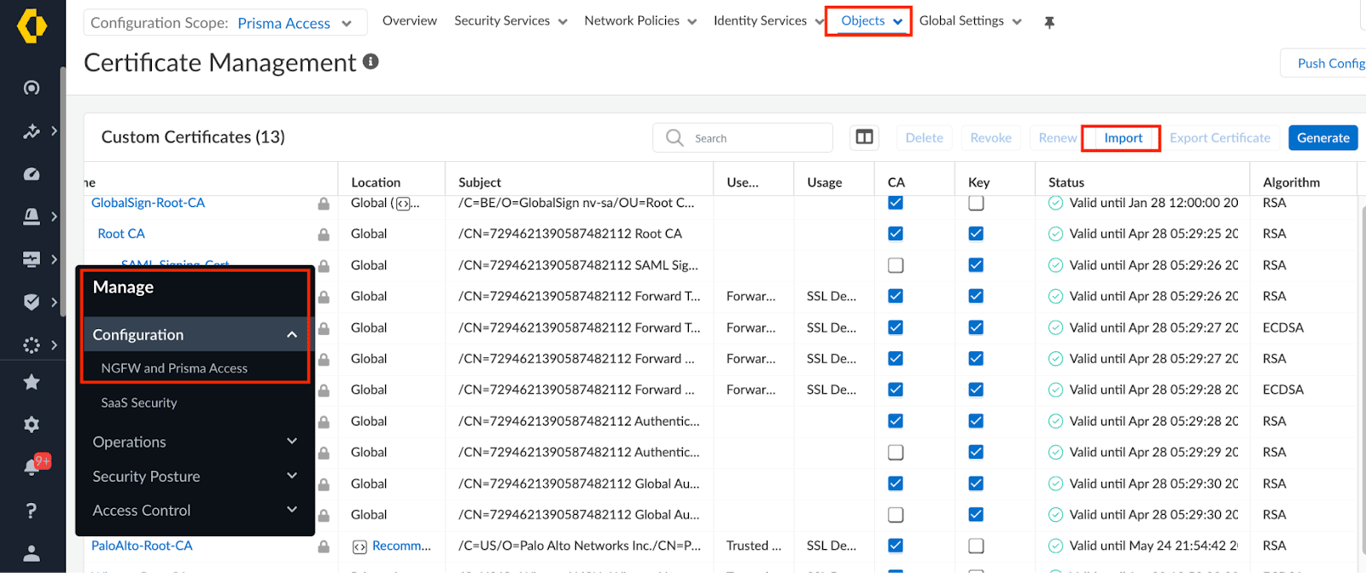
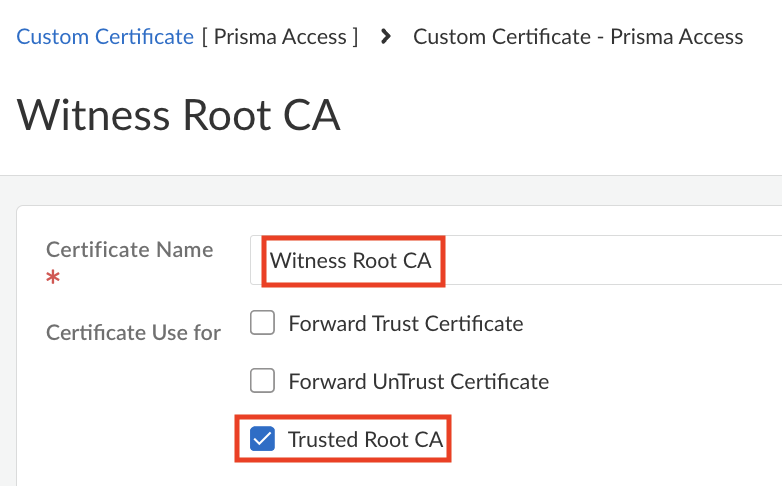
- Click Import → Import to import the WitnessAI proxy cert provided by Account Team, Select Trusted Root CA and Save
2. Setup EDL Certificate Profile
- Certificate will be provided by the Account Team.
- Go to Objects → Certificate Management and click on Import
- Give the certificate name as Witness-AI-CA and upload the CA certificate by clicking on Browse
- Go to Objects → Certificate Management → Certificate Profiles and click on Add Profile
- Give the name as Witness-AI-CP and click on the Add button under CA Certificates
- Select the Witness-AI-CA certificate and Save
- Use this certificate Profile for the EDL Configuration.
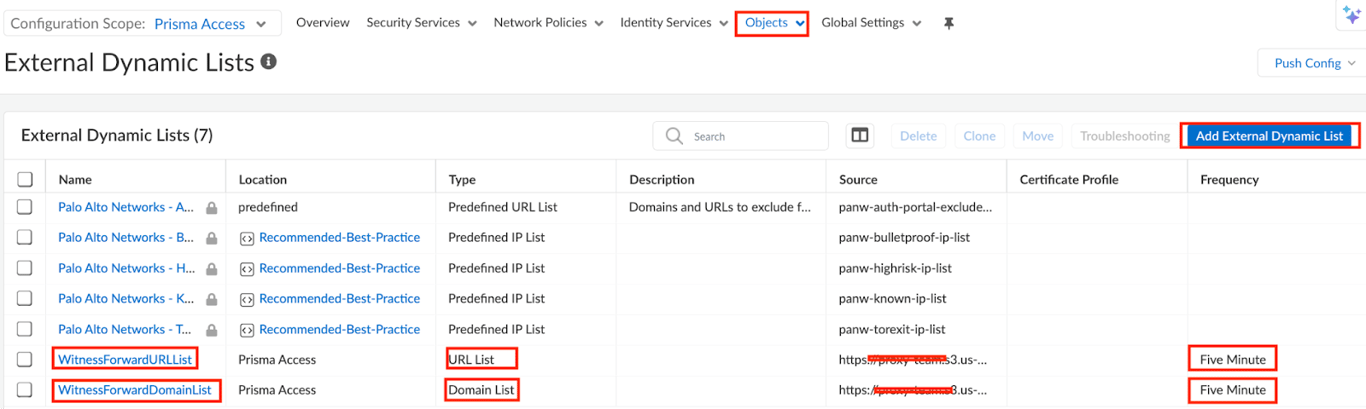
3. Create External Dynamic Lists
This section will focus on creating the WitnessForwardDomainList, which are LLM domains that need to be forwarded to WitnessAI.
- Select Manage → Configuration → NGFW and Prisma Access → Objects → External Dynamic List. Select the Prisma Access configuration scope.
- Click Add External Dynamic List and enter the following configurations:
- Name → WitnessForwardURLList
- Type → URL List
- Source → https://api.[tenantID].[region].witness.ai/v1/edls/urllist.txt
- Certificate Profile → Witness-AI-CP
- Check for Updates → Every Five Minute and Save
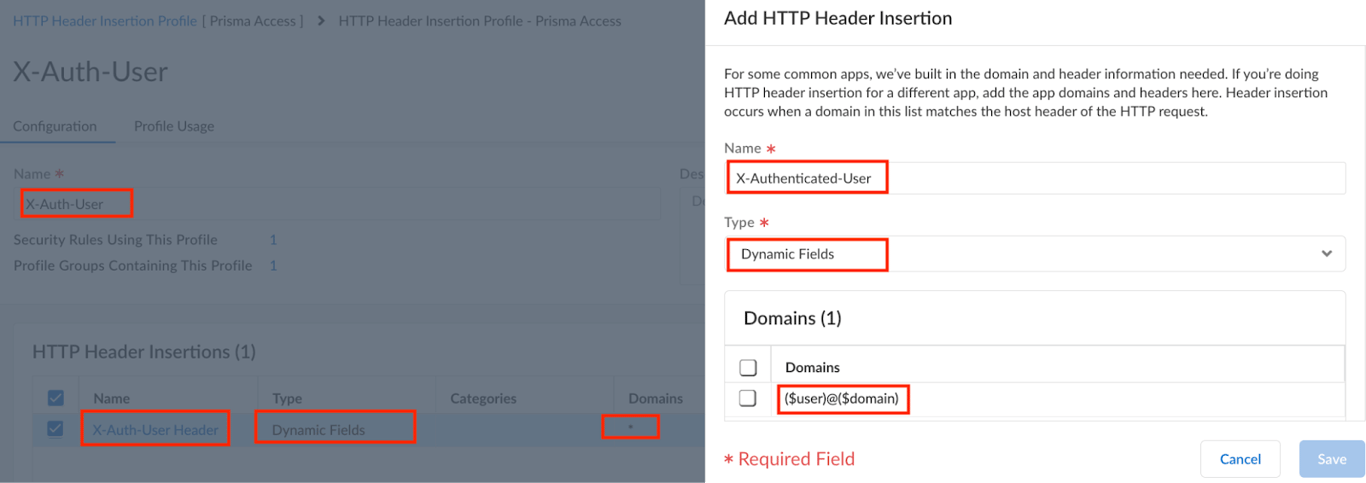
4. HTTP Header Insertion
Configure HTTP Header Insertion to insert the user email address in the X- Authenticated-User Header field before forwarding the traffic to Witness AI proxy.
- Select Manage → Configuration → NGFW and Prisma Access → Security Services → HTTP Header Insertion. Select the Prisma Access configuration scope.
- Click Add Profile to set the following settings:
- Name → X-Auth-User
- Click Add Rule to set the following settings:
- Name → X-Auth-User Header
- Type → Dynamic Fields
- Domain → *
- Add Headers → X-Authenticated-User
- Value → ($user)@($domain)
- Tick the Log box and Save
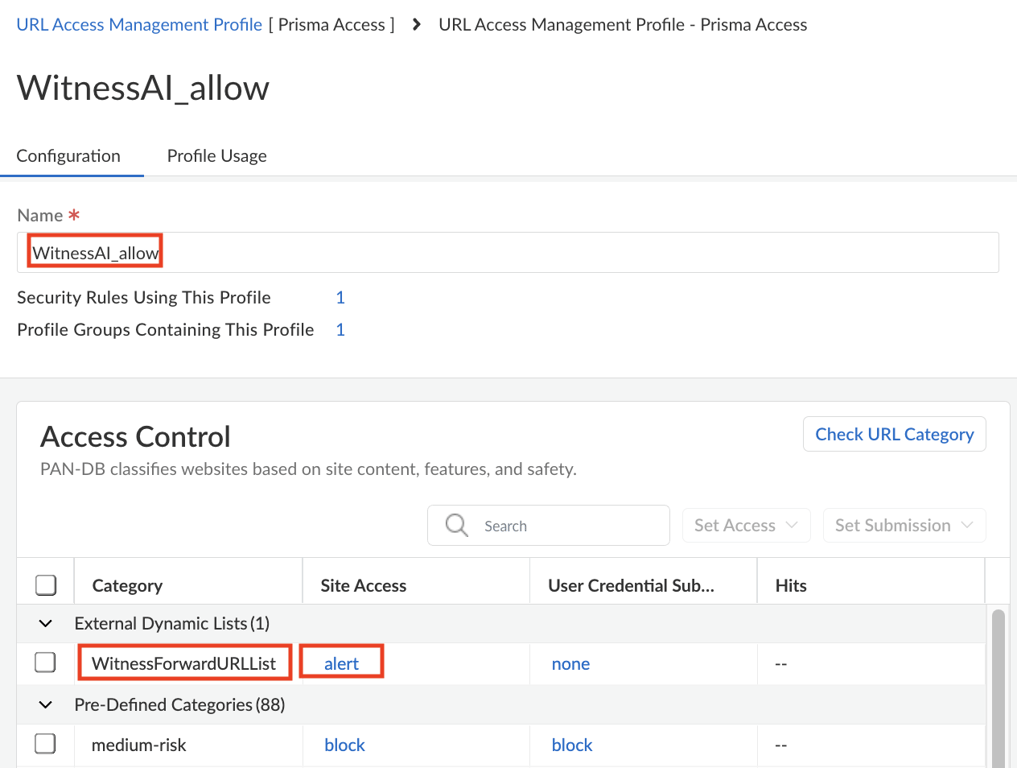
5. URL Access Management
This will ensure URL filtering logs are created for any traffic matching WitnessForwardURLList EDL domains.
- Select Manage → Configuration → NGFW and Prisma Access → Security Services → URL Access Management. Select the Prisma Access configuration scope.
- Click Add Rule to set the following settings:
- Name → WitnessAI_allow
- Under External Dynamic Lists, select WitnessForwardURLList and change Site Access to alert.
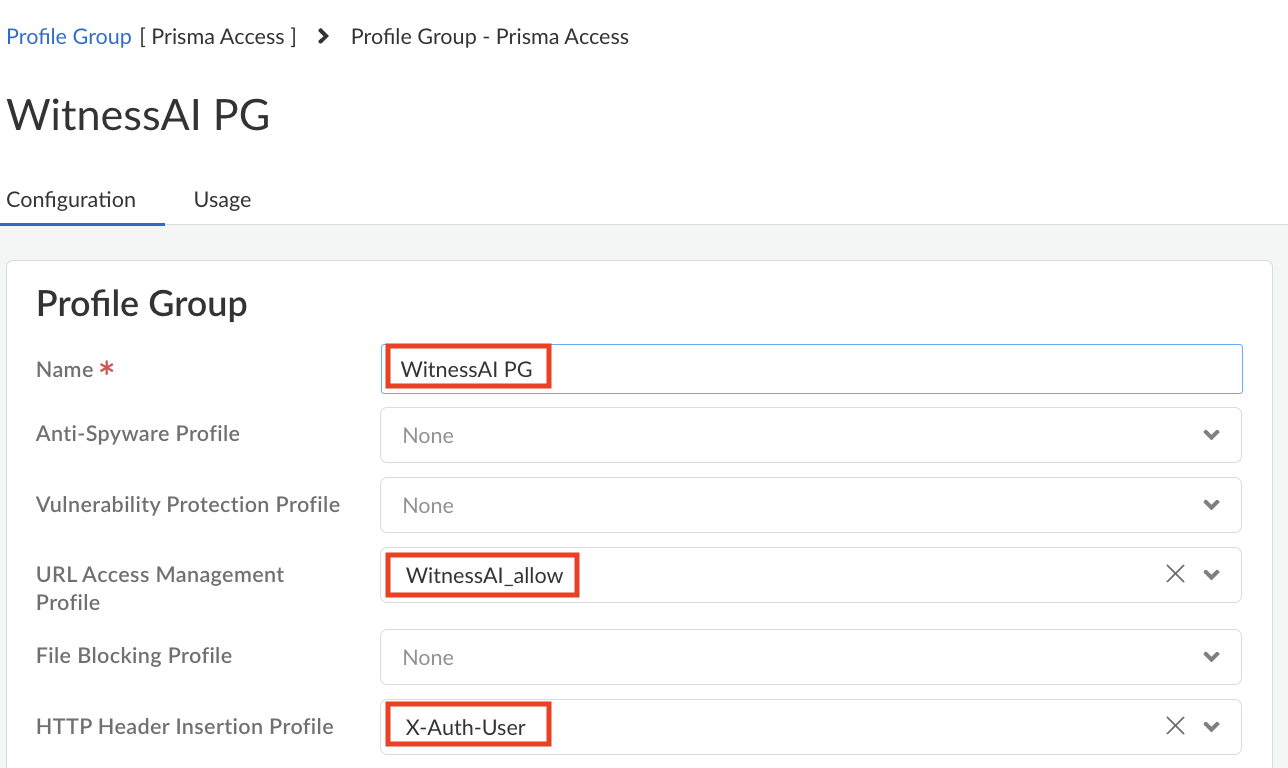
6. Profile Groups
Attach HTTP Header Insertion Profile and URL Access Management Profile to the Profile Group.
- Select Manage → Configuration → NGFW and Prisma Access → Security Services → Profile Groups. Select the Prisma Access configuration scope.
- Click Add Rule to set the following settings:
- Name → WitnessAI PG
- Under URL Access Management Profile, select WitnessAI_allow
- Under HTTP Header Insertion Profile, select X-Auth-User and Save
7. Security Policy
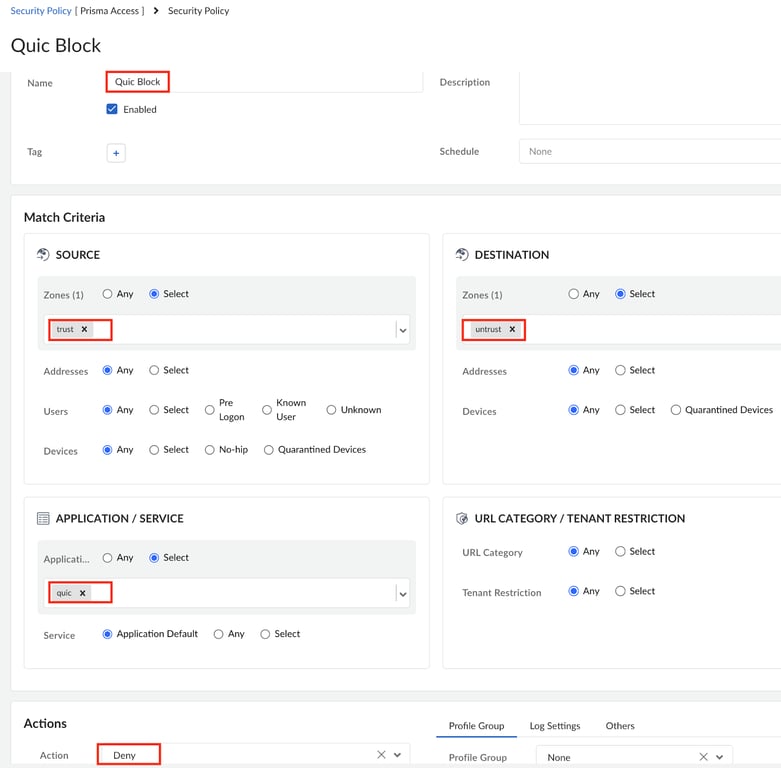
i. Create Security Policy to block Quic
Quic is a Google developed protocol which uses UDP for web connections and limits the firewall visibility and ability to analyze and apply security actions.
If the Quic protocol is not already blocked, please perform below steps.
- Select Manage → Configuration → NGFW and Prisma Access → Security Services → Security Policy. Select the Prisma Access configuration scope.
- Click Add Rule → Security Rule (Pre Rule) to set the following settings:
Pre-rules are global rules that take precedence over deployment-specific rules and are applied to traffic first.
- Name → Quic Block
- Source Zone → trust
- Destination Zone → untrust
- Application → quic
- Action → Deny and Save
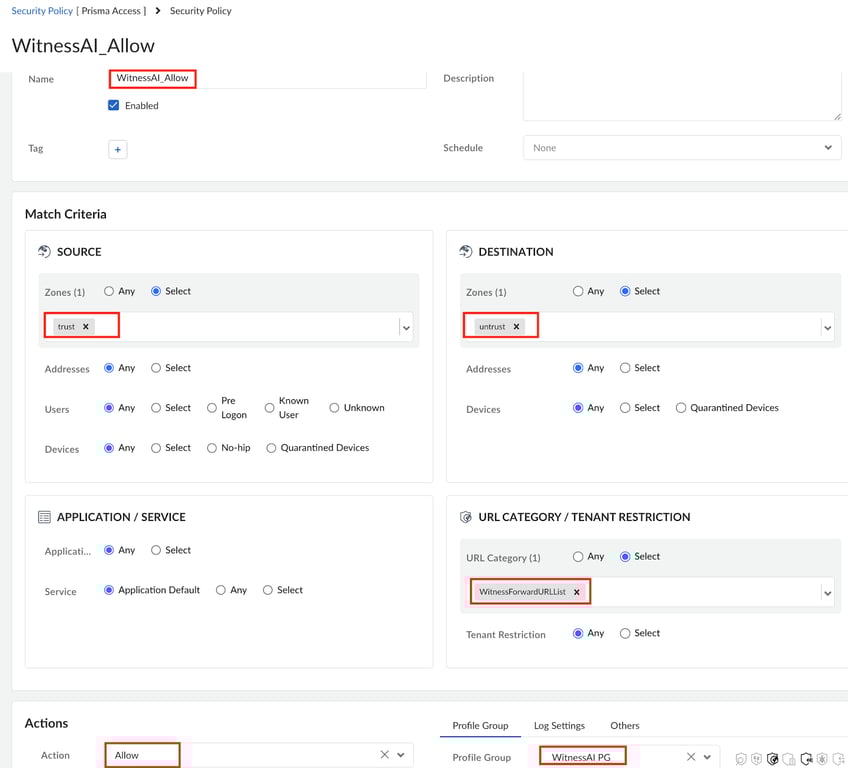
ii. Create Security Policy for allowing traffic to WitnessAI Proxy.
Attach the WitnessAI PG profile group with this policy. This rule will insert the HTTP header and generate the URL filtering logs for the traffic towards WitnessForwardURLList.
- Select Manage → Configuration → NGFW and Prisma Access → Security Services → Security Policy. Select the Prisma Access configuration scope.
- Click Add Rule → Security Rule (Pre Rule) to set the following settings:
- Name → WitnessAI_Allow
- Source Zone → trust
- Destination Zone → untrust
- URL Category → WitnessForwardURLList
- Profile Group → WitnessAI PG
- Action → Allow and Save
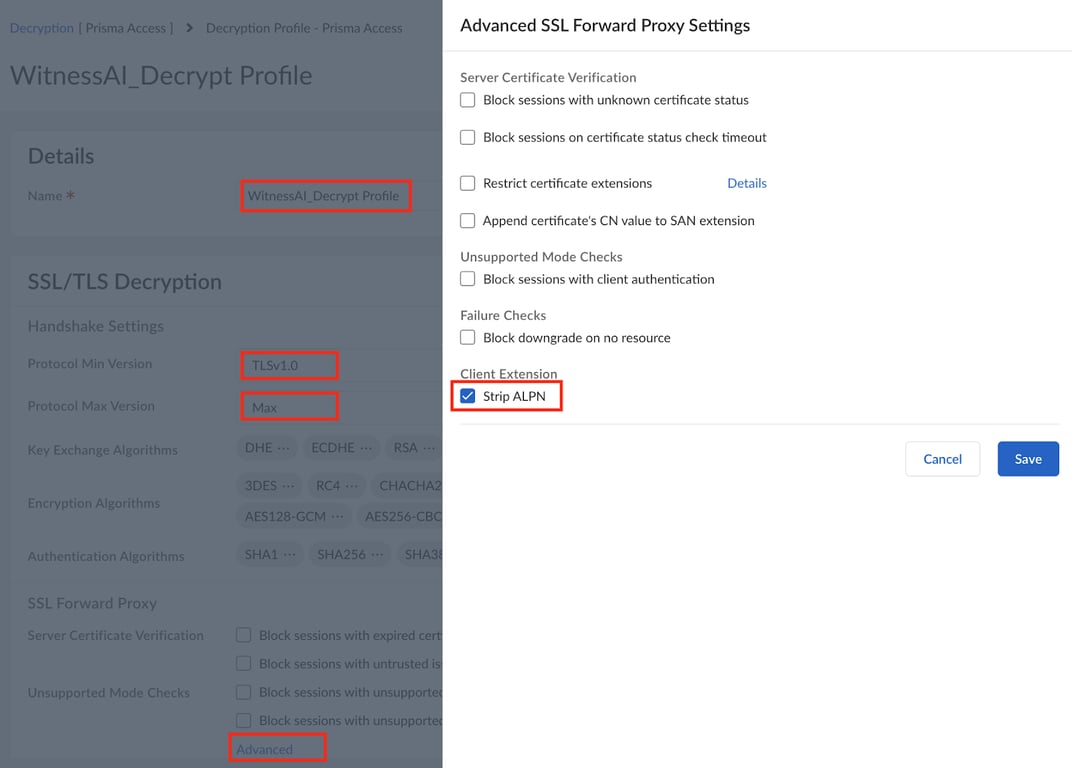
8. Create Decryption Profile & Policy
- Select Manage → Configuration → NGFW and Prisma Access → Security Services → Decryption. Select the Prisma Access configuration scope.
- Click Add Profile to set the following settings:
- Decryption Profiles → Name → Witness-Decrypt Profile
- SSL/TLS Decryption → Advanced → Enable Strip ALPN
The Palo Alto Firewall supports header insertion for HTTP/1.x traffic only; it does not support header insertion for HTTP/2 traffic.
- SSL/TLS Decryption → Select Protocol Min Version as TLSv1.0 and Protocol Max Version as Max, and Save
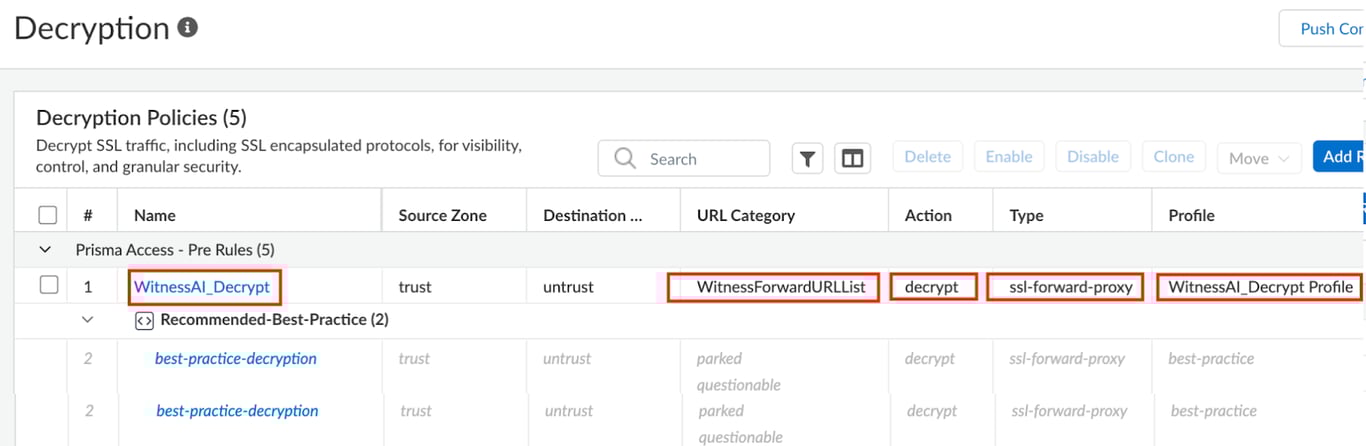
- Create a new Decryption Policy to decrypt WitnessForwardURLList URL category. Make sure this is placed above the ‘O365-Best-Practice’ rule or any other SSL Decryption Bypass rules.
- Click Add Rule to set the following settings:
- Name → WitnessAI_Decrypt
- Source Zone → trust
- Destination Zone → untrust
- URL Category Entities → WitnessForwardURLList
- Action → Decrypt
- Type → SSL Forward Proxy
- Decryption Profile → WitnessAI_Decrypt Profile
Explicit Proxy Configuration
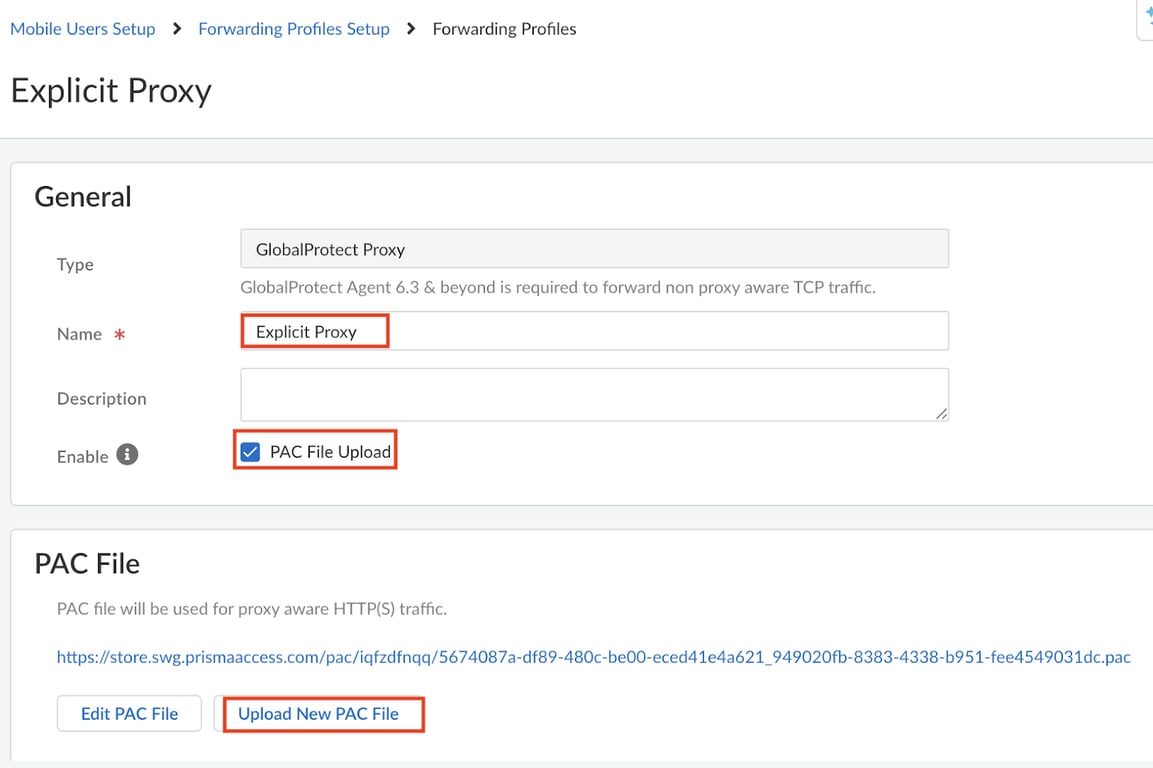
1. Create a Forwarding Profile
Explicit Proxy Forwarding Profiles enable to employ PAC files to define which traffic to forward to Prisma Access.
Select Workflows → Prisma Access Setup → Explicit Proxy Setup → Forwarding Rules → Forwarding Profiles Setup → Add Forwarding Profile → GlobalProtect Proxy
- Name → Explicit Proxy
- PAC File Upload → Enable
- Select Upload New PAC File to upload an existing PAC file. After Save we should see the Prisma hosted PAC URL.
Note: The Accounts team will provide the WitnessAI PAC. Customers using an existing PAC file must incorporate LLM domain logic from the WitnessAI PAC to ensure traffic is routed through the WitnessAI Proxy.
2. Attach Forwarding Profiles to GlobalProtect App Configuration
Select Workflows → Prisma Access Setup → GlobalProtect → GlobalProtect App App Settings → Show Advanced Options
- Agent Mode for Prisma Access → Tunnel and Proxy
- Forwarding Option → Forwarding Profiles
- Forwarding Profiles → Select Explicit Proxy profile which we created earlier and Save
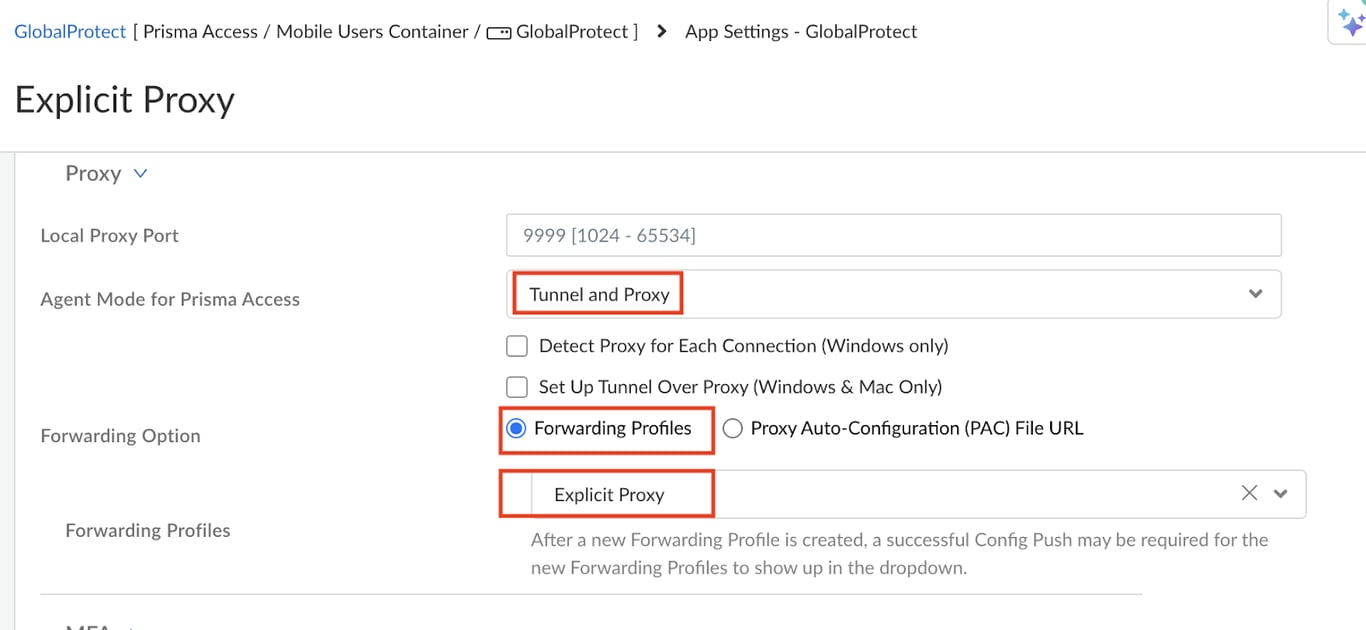
Note: Customer have an option to host custom PAC URL in any publicly accessible server (eg. Amazon S3)
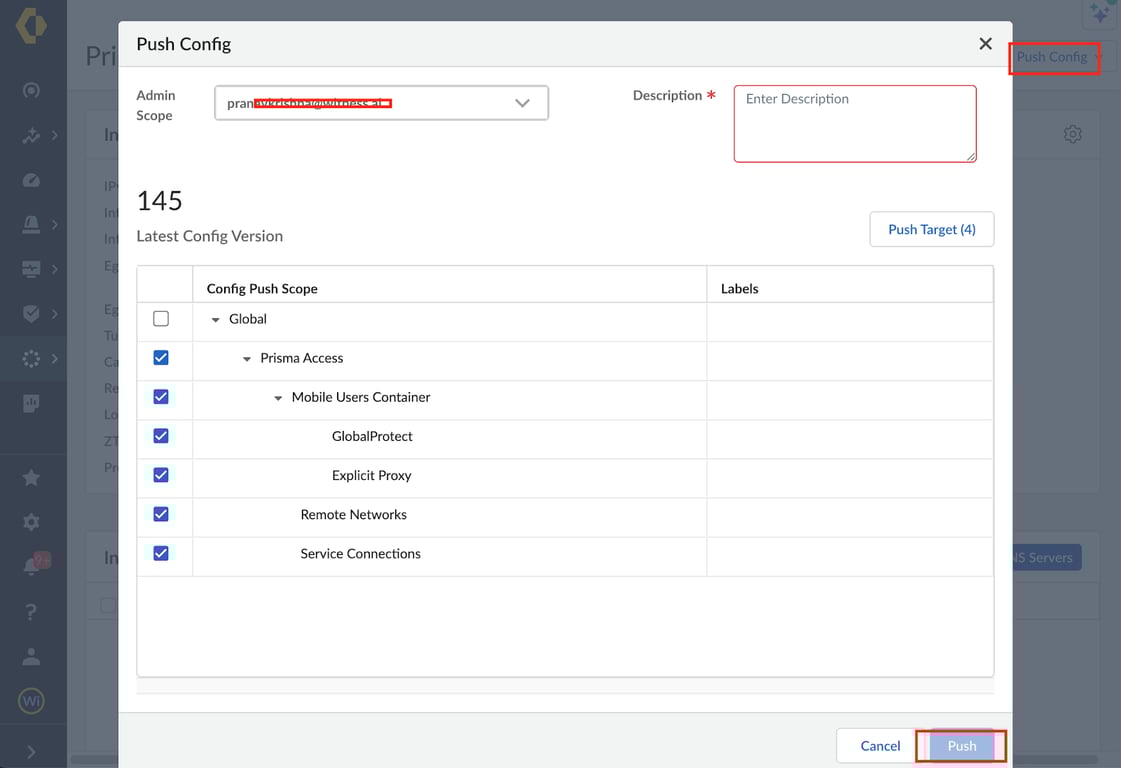
10. Push Config
The last step is to push the changes to the Prisma Gateways. Click Push to enable the configuration changes made.
Copied from:
Prisma Access: Explicit ProxyTraffic FlowGeneral Configuration1. Install WitnessAI Root Certificate2. Setup EDL Certificate Profile3. Create External Dynamic Lists4. HTTP Header Insertion5. URL Access Management6. Profile Groups7. Security Policyi. Create Security Policy to block Quicii. Create Security Policy for allowing traffic to WitnessAI Proxy.8. Create Decryption Profile & PolicyExplicit Proxy Configuration1. Create a Forwarding Profile2. Attach Forwarding Profiles to GlobalProtect App Configuration10. Push Config
 Made with Bullet